
How to create SCCM Boot Image using DISM. This is a step-by-step guide where we create a boot image to be used with Configuration Manager from scratch using only Windows Assesment and Deployment Kit and DISM.
I wanted to create a boot image from scratch that is capable of running a configuration manager task sequence, using nothing but command-line tools. My first step was to identify which components in the boot image are required by ConfigMgr. Microsoft made this easy for me as they list in sccm which components they add to the boot image.
Requirements
- Windows Assement and Deployment Kit for Windows 10.
I used ADK1703 for this guide.
Create SCCM Boot Image using DISM
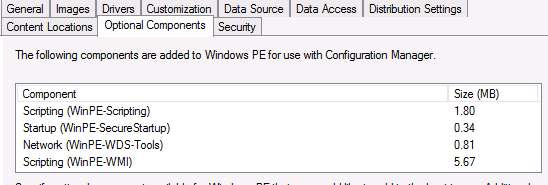
SCCM requires the following componets in a Windows PE boot image:
- WinPE-Scripting
- WinPE-SecureStartup
- WinPE-WDS-Tools
- WinPE-WMI
We will add the following optional components to enable support for PowerShell in the boot image:
- WinPE-NetFx
- WinPE-PowerShell
Start by installing ADK 1703 on a computer. Start “Deployment and Imaging Tools Environment” from start menu once ADK is installed.
- Execute copype.cmd <architecture> <destination>. Architecture can be x86 and amd64.
I execute copype.cmd amd64 c:\boootimage\winpe_x64 to create a 64-bit boot image in c:\windows\x64.The command copies copies the base boot image and creates the following folder structure:

- Mount the base boot image.
dism /Mount-Image /ImageFile:”C:\bootimage\winpe_x64\media\sources\boot.wim” /index:1 /MountDir:”C:\bootimage\winpe_x64\mount”
The boot image is now mounted and we can add the neccessary components to it required by SCCM. - Add the required packages for SCCM. The following command adds the WinPE-Scripting package. Repeat it to add any additional packages, replacing WinPE-Scripting.cab with your package. The remaning packages we add in this guide is located in the same folder as WinPE-Scripting.cab
dism /Add-Package /Image:”C:\bootimage\winpe_x64\mount” /PackagePath “c:\program files (x86)\Windows Kits\10\Assessment and Deployment Kit\Windows Preinstallation Environment\amd64\WinPE_OCs\WinPE-Scripting.cab” - Commit the image once all packages are added to the image.
dism /Unmount-Image /Mountdir:”c:\bootimage\winpe_x64″ /commit
Boot image is now successfully created.
I added the boot image to SCCM, distributed it to my distribution points, and configured a task sequence used to install Windows 10 1703 to use this boot image. That task sequence had steps to change a computer from legacy BIOS to UEFI, so I figured that would be an appropiate test if the boot image I created was good enough.
A test on a HP Elitebook 840 G3 showed that it worked perfectly.
There was a few mistakes, so I corrected them:
C:\bootimage\winpe_x64\media\sources\
dism /Mount-Image /ImageFile:”C:\bootimage\winpe_x64\media\sources\boot.wim” /index:1 /MountDir:”C:\bootimage\winpe_x64\mount”
dism /Image:”C:\bootimage\winpe_x64\mount” /Add-Package /PackagePath:”C:\Program Files (x86)\Windows Kits\10\Assessment and Deployment Kit\Windows Preinstallation Environment\amd64\WinPE_OCs\WinPE-Scripting.cab”
Dism /Unmount-image /MountDir:C:\bootimage\winpe_x64\mount /Commit